Second Mod - Add external buttons and an automated height controller
******* PLEASE NOTE *********
I did this with my B4 30W laser unit, I cannot guarantee that it will be the same for your laser and you may break something if you attempt this. I am not responsible for anything you do to your laser if you follow my instructions.
This Blog article will give an overview of the project and all the files will be made available in my Github account www.github.com/gadjet
The github files will follow on after this blog post so please be patient if they aren't there yet.
While I was moving the Stepper controller inside the main body of the Commarker B4 30W laser I decided that I could tap into the lift buttons on the front of the unit and using the now spare 5 way cable, that used to connect to the stepper controller, connect to some external buttons to move the head up and down.
This was a good idea for me because the orientation of the laser unit means that I have to face it from the side and I can't see the buttons easily.
 |
| 3D Printed enclosure for the external buttons |
When I changed the 5 way connector on the back of the laser (old stepper controller connection) and replaced it with a 4 way connector (from the original stepper controller enclosure) I was able to use the redundant 5 way connector in a spare, unused, hole at the rear of the laser to plug in the external buttons.
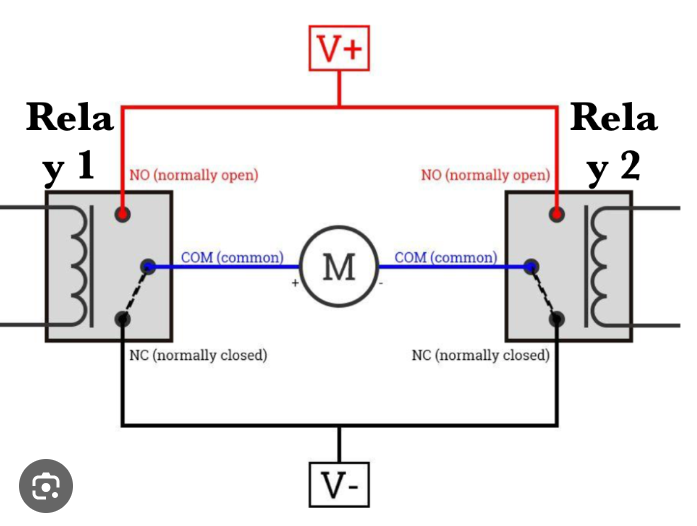
How the current buttons work
The front buttons on my B4 30W are connected to a motor controller module that switches the polarity of the DC motor depending which button is pressed to drive the laser head up or down.
The Module has two relays to control the polarity of the motor, at rest (no buttons pressed) both motor connections are connected via the relays to ground, this shorts the motor so it would be difficult to move.
When the UP button is pressed one of the relays switches one of the motor connections to positive causing the motor to move the head up, if the other button is pressed the opposite motor connection is connected to positive and the motor moves the headDOWN.
When the button is released the motor connections are then grounded again bringing the motor to a quick stop. This is know a an H-Bridge arrangement.
 |
| Motor direction control example circuit |
The addition of the external buttons
To enable the external controller to activate the motor I tapped in parallel with the buttons so that they would still work if the external buttons were not plugged in.
The drawing below shows how the external buttons were connected in parallel to the existing buttons, I have kept the wire colours as I found them inside the Laser. The external buttons connector has the pins shorted out so that the internal buttons will also work, if the external buttons are disconnected then they will stop working and a shorting plug would be required. The interconnecting cable is the one that was provided witht the external stepper controller which I placed inside the laser and was no longer required.
The addition of the height controller
Main components
The last stage of my modification was to add an external controller that could move the Galvo head to a known height that could be entered on my PC.
To achieve this I needed a method of detecting the position of the laser head relative to the base of the laser, after looking into to some laser distance measuring devices that used IR lasers and detectors using TOF (Time Of Flight) measurements to detect range I realised that the accuracy and repeatability for the reasonably priced detectors was not good enough.
I settled on using a Linear scale, a device used on lathes and milling machines to accurately and reliably measure distance for linear movement.
 |
| Linear Scale - sourced from Aliexpress |
These devices come in different lengths and I chose 550mm. The Linear scale is secured to the top and bottom of the Z height tower of the laser using some 3D printed brackets I designed and the moving sled is attached to the Galvo head and moves up and down with the head. The signals from the linear scale are fed into two interrupt pins of an ATMega328P (as used in the Arduino UNOs)
As the Linear scale is a relative measuement method rather than absolute we need a way to define a reference point at a known measurement, to do this I used an inductive sensor that can detect the presence of the metal in the laser head unit and feedback to the controller when the head reaches a known position.
 |
| Inductive Sensor - Sourced from Amazon |
These sensors are also used to stop the motor movement at the extremes of the Z height range. One thing to note is that these sensors come with a wide voltage supply range but typically start at 6V but I've found that mine work fine at 5V, make sure your choice of sensor does work at 5V.
Component overview
The rendering below shows the position of the components added to the Z height tower (without the tower in the picture)
OK so the next thing is to connect all the parts to the controller, the controller is a custom PCB based on an Atmel Mega328p 8 bit processor (Arduino UNO) but you could use an Ardunino UNO, Nano, ESP based processor or any other with suitable IO.
I chose the 328P because it is relatively cheap and available at JLCPCB where I get my PCBs made.
I also included a serial to USB interface so the controller could be connected to a computer and interact with the user via the custom application.
The code I run is, apart from a couple of tweaks, generated by the Google Gemini Canvas AI.
The PCB has the ISP programming connector because the chips have no bootloader code as supplied so this need flashing before you can load a sketch. There are also connectors for some of the spare GPIOs and the I2C bus so a display could be connected or even a laser distance measuring device if you like but please note that the voltage is 5V and NOT 3.3V.
Although initially the hardware was created with the intention of driving a stepper motor controller I've currently configured the code to drive the DC motor controller in the Laser unit, therefore Down for the motor uses the "DIR" connection and the Up uses the "STEP" connection
In this second version I added all the screw terminal connections so that each sensor could be connected, you can connect directly to the screw terminals or, like I did, use aircraft type connectors
- 2 off 4 pin 12mm connectors for the Limit Switches and the Linear scale
- 2 off 5 pin 16mm connectors for the external buttons and the motor wires to the laser unit.
PC Software
The PC software is a work in progress and is written in Visual Studio/Visual Basic and connects to the controller via USB allowing 2 way communication, the application displays the mm of movement as the laser head moves up and down and is also used to trigger a fixed distance movement up or down and to calibrate the position of the laser head to a known distance from the base.
The current functions of the PC application: -
- Display the available comm ports and connect/disconnect
- Display the position of the laser head in mm
- Calibrate the distance from the top limit switch to the base
- Measure the distance from the head to the base and set the height to that value
- Trigger a fixed distance move in mm from the current position
- Setup some pre-defined positions on the three configurable buttons
- Focus position for each lens?
- Display the text data recieved from the controller in the console window
All the 3D files, Sketch and PC software will be available on my Github within the next couple of weeks.
Please note that this project is a work in progress and may change in functionality as time moves on also I make no guarantees on the functionality and/or safety of this software, use at your own risk.


No comments:
Post a Comment