It's been a long time since my last post but I thought I would write up about my latest project - a door/window sensor using an ESP 8266.
I've bought a few door sensors in the past from Tuya and a Hive one (load of rubbish) but I came across a brilliant YouTube video from a gent called MakerMeik who used a logic toggle circuit to wake up the ESP from sleep mode when a reed switch is opened or closed (https://youtu.be/vxbuO1zWo3w).
Using the two XOR logic gates alowed both the door open and door closed to wake up the ESP by toggling the Enable pin whilst also passing the reed switch state to the ESP to publish.
Mike used the ESP to connect to the router via DHCP (or fixed IP) which took a few seconds to establish before then logging onto your MQTT server and publishing the door status.
So I downloaded Kicad and gave it a try, I had tried Kicad a few years ago and was a bit disappointed but the latest version was streets ahead of what I remembered and I soon had a PCB ready to send off for fabrication.
 |
| Bare PCB |
 |
| Populated PCB |
The PCBs were delivered and I assembled one which worked as expected (nice surprise) and while I was waiting for the PCBs to arrive back from PCBWay I exported the PCB design as a 3D model (STEP file) which I was able to import into Fusion360 and use as the basis for an enclosure.
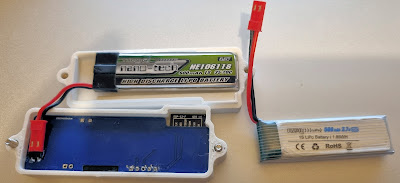
Initially my idea was to use an 18650 Lithium cell as I had plenty that I'd reclaimed from old laptop batteries, which still had reasonable capacities, my idea was to use two halves that could be screwed together holding the PCB and battery, this could be screwed to a surface or stuck on with double sided adhesive tape.
The design is quite tall at 33mm but this is OK for my back door which is double glazed and the door is quite deep so the deep back places the reed switch nicely inline with the magnet on the door.
 |
Printed enclosure
|
Having finished this version of the sensor I've been investigating ways to increase the battery life and reducing the overall size.
I found some smaller batteries that I could use with this design in conjunction with ESP-NOW code that uses alot less transmission time so I designed another rear half that is alot shallower for the new battery.
 |
| Smaller rear half for smaller battery |
One tip I can give is to buy the plastic encapsulated reed switches instead of the normal glass ones as they are prone to breaking, even though I used surface mount pads to solder the switch rather than having to bend the wires to go through holes.
With my next version I will be trying out the PCB assembly service from JLCPCB so that I can utilise smaller SMD components and not have to solder them together myself!!
Some things I want to improve: -
- Smaller size
- Longer battery life and/or smaller battery
- Add voltage divider to monitor actual battery voltage
- Have a dual supply solution to use 1.5V AA cell with booster or single 3.6V Lipo cell without booster
- Learn about ESP-NOW
There are plenty of clever people out there on YouTube with some great ideas around home automation and using the ESP8266 and ESP32 so time to watch some videos.
The code for the device is available from MakerMeik's GIThub page, watch his video.
Version 2 coming soon .......


4 comments:
Hello Gadjet,
i found your project in the comments of MeikerMaik's video. I am interested in building it, because my zigbee based sensor are not very reliable. But the improvements of version 2 you mentioned are very interesting for me.
Do you know when you will publish version 2?
kind regards
Andy
Andy,
Have a look at my GIThub https://github.com/gadjet/Window-Door-Sensor-V2
Hello Gadjet,
Could you please include the BOM file for the components? I'd like to order the boards pre-assembled, thank you.
Jay
Hi, I will see what I can do, I didn't produce a BoM because I only ordered the bare PCBs.
I will generate a BoM file and add it to the GIT page.
Phil
Post a Comment